

An Older Restoration Revisited
This 1956 Ford Thunderbird is owned by our local Mercedes Benz and Jaguar dealer. He has a fairly nice collection of cars and this one is actually his wife's toy. It had a full frame-off restoration about 8 or 10 years ago. Either it sat virtually unused since or many of the seals were not replaced at that time. For whatever reason, nearly everything that holds fluid, leaked badly. The car is to be loaned to the Oklahoma City Museum of Art in late June 2005 where it will be displayed, along with other American art for the next 3 months. The owner felt that it would be too embarrassing to have it publicly displayed at such a prestigious site leaking oil all over the floor. He contracted me to find and correct those leaks. The following is a brief description of the project.
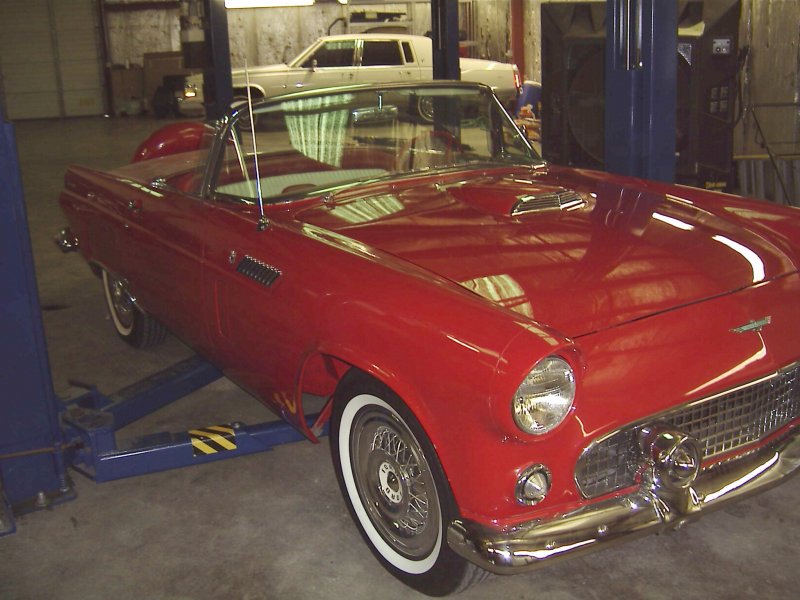
 Here is the car as it looks today. As you can see, it was a very high quality restoration. All these photos
were taken after my work was completed, with the car still on the lift where it was done. I have to apologize
for the shop clutter and the lift sometimes obstructing the view.
Here is the car as it looks today. As you can see, it was a very high quality restoration. All these photos
were taken after my work was completed, with the car still on the lift where it was done. I have to apologize
for the shop clutter and the lift sometimes obstructing the view.
 My first step was to raise it on the lift and investigate the underside for possible sources of the leaks.
Unfortunately, there was too much grease and grime for that effort to be productive. Instead, I had to
spend considerable time and effort cleaning all the muck away so as to start with a fairly fresh bottom.
My first step was to raise it on the lift and investigate the underside for possible sources of the leaks.
Unfortunately, there was too much grease and grime for that effort to be productive. Instead, I had to
spend considerable time and effort cleaning all the muck away so as to start with a fairly fresh bottom.
 We had no steam-cleaning equipment and would have been reluctant to use it anyway. The remaining option
seemed to be, lift the car, get several cans of spray brake cleaner, lots of shop towels and begin the
long process of removing grime by hand.
We had no steam-cleaning equipment and would have been reluctant to use it anyway. The remaining option
seemed to be, lift the car, get several cans of spray brake cleaner, lots of shop towels and begin the
long process of removing grime by hand.
 Before starting, it was virtually impossible to be certain that the underside of the floor had been painted
red to match the body. It has an 'X' frame member and every inch of the frame, as well as the underside of
the floor and body, was thickly caked in oil-soaked dirt, sand and other road grime.It required a few hours
to get the frame cleaned to the point I thought I might be able to drive the car to promote leaking so as to
see fresh oil and, hopefully, locate the leak sources.
Before starting, it was virtually impossible to be certain that the underside of the floor had been painted
red to match the body. It has an 'X' frame member and every inch of the frame, as well as the underside of
the floor and body, was thickly caked in oil-soaked dirt, sand and other road grime.It required a few hours
to get the frame cleaned to the point I thought I might be able to drive the car to promote leaking so as to
see fresh oil and, hopefully, locate the leak sources.
The Diagnosis
I waited for a nice day, since the top was not with the car, and put about 25 miles on it. That should be enough to see where the leaks were coming from. Impressions while driving? The car drives fairly nice, considering it is a '56 and these cars were not really all that great to start with. Its 312 cu. in. V-8 probably won't snap your neck but it has all the pep one really needs in this sort of car. Of course, I was test driving to find leaks, not evaluate performance. I did find the the power steering to be acceptable and the power brakes stop but do not overpower. At 50 or 60 miles per hour, it certainly is no sportscar but it handles well enough. It does turn heads though, on the road or stopped.
After driving and putting it back on the lift, I found the underside cleaner than I expected. The major leaks appeared to be power steering fluid. Of course, some of that could have been transmission fluid instead but I did not find much motor oil. Further testing seemed to be in order as the prior condition surely indicated more leaking than I had found. Meanwhile, I tried tightening every nut, bolt and fitting that seemed at all loose.
Further work had to be delayed as the car was scheduled to be entered in an annual Dealer's Auto Show and would be unavailable for several days. I suspect whoever drove it to the show site and back, put in a few extra miles and probably tested the performance more than I had. When I got back to it, the underside was again completely coated in oil and road grime. Fortunately, it had not collected nearly as much dirt as before so was much easier to clean this time. Also, the leaks were much more obvious.
On final inspection, I found antifreeze on the bottom of the radiator, indicating a small leak that I had not seen before. There was fresh motor oil on the front crossmember as well as the oilpan and the entire front of the engine was deeply covered in muck. Removing the torque converter inspection plate revealed motor oil as well as transmission fluid. Everything on the power steering leaked. Even the hoses seeped a little. The only potential leak point that seemed to be all right was the transmission rear seal. Of course, that is the one item that is easy to replace. I mention that, not as a point of irony, but to suggest that the previous restorer possibly replaced it and nothing else. Of course, it is always possible that it was replaced later, after all the seals had hardened.
The above indicated a complete power steering overhaul as well as front and rear seals for both the engine and transmission. With that knowledge, I gave the owner a rough estimate of the extent of repairs needed and he accepted. I provided a list of parts I knew would be needed and he chose to order them. There were some problems with the parts supplier he had used previously, this is not his only Thunderbird, resulting in a 6 week delay before I got started tearing things down.
The Repairs
Removal of the engine and transmission, as a unit, proved to be relatively uneventful, with a couple of pairs of extra hands to help keep everything under control, except that I had never worked on a T-Bird before. Thus, I spent more time than usual disconnecting things and making sure there would be no major conflicts or obstructions. Of course, the front-hinged hood had to come off as well as the radiator. I also removed the complete power steering system and the air conditioner compressor, being careful to not discharge the R-12 system, before starting. The hardest part was probably disconnecting linkages from the transmission. There is a fair amount of working room under the hood but not so around the transmission. That 'X' frame member makes it quite difficult to reach most of these parts.
With everything removed, we ordered a rebuilt power steering pump, sent the radiator for repair and I began the required disassembly. One of the first problems I found upon separating the transmission from the engine was a deep groove worn into the torque converter nose by the front seal. It too had to be sent for repairs. The nose is bolted on from the inside, requiring tear-down. That turned out to be a good thing as the rebuilder found it just about ready to shuck its inards. A rebuild of it was in order, including a new ring gear. Meanwhile, I rebuilt the power steering ram and control valve.
 The next order of business was the engine main seals. I discovered that the front seal is installed from the
inside. That meant that the water pump and timing chain cover had to be removed, about 50 pounds of cast iron.
The way that seal is installed, a typical seal remover was useless. It took close to an hour to drive it out
with makeshift tools. That job paled, however, when I got to the rear seal. This was also my first time to
The next order of business was the engine main seals. I discovered that the front seal is installed from the
inside. That meant that the water pump and timing chain cover had to be removed, about 50 pounds of cast iron.
The way that seal is installed, a typical seal remover was useless. It took close to an hour to drive it out
with makeshift tools. That job paled, however, when I got to the rear seal. This was also my first time to
 work on an old Ford Y-Block V-8. The rear seal resides about 4 inches up into the casting with less than an
inch of working room on either side. My fingers are not that long so a long handled tool was required for
every step. It is a rope seal so a Sneaky Pete was used to remove the old and install the new one. That is
something like those old Chinese Finger Trap things we had as kids. It is threaded through the seal seat and
the new seal is "trapped" in it then pulled through while turning the crankshaft to aid the effort. The hardest
part there was the unusually small size of the opening the seal had to be pulled into. The last and by far the
most tedious step was cutting off the excess ends of the seal after pulling it in. There is no way to get a
work on an old Ford Y-Block V-8. The rear seal resides about 4 inches up into the casting with less than an
inch of working room on either side. My fingers are not that long so a long handled tool was required for
every step. It is a rope seal so a Sneaky Pete was used to remove the old and install the new one. That is
something like those old Chinese Finger Trap things we had as kids. It is threaded through the seal seat and
the new seal is "trapped" in it then pulled through while turning the crankshaft to aid the effort. The hardest
part there was the unusually small size of the opening the seal had to be pulled into. The last and by far the
most tedious step was cutting off the excess ends of the seal after pulling it in. There is no way to get a
 razor blade in there and I was unable to find any tool for accomplishing the job. After wasting several hours
trying, I finally gave up and modified an Exacto knife for the job. See below for a description of this tool.
This formed a sharp tool capable of reaching the seal and, very slowly, cutting off the excess. I think it
still took over an hour to cut both ends flush with the casting as that is one tough rope. After getting it
out, I just tried cutting it with a single edge razor which probably took nearly 10 minutes of sawing. These
photos are of the engine after detailing and reinstalling.
razor blade in there and I was unable to find any tool for accomplishing the job. After wasting several hours
trying, I finally gave up and modified an Exacto knife for the job. See below for a description of this tool.
This formed a sharp tool capable of reaching the seal and, very slowly, cutting off the excess. I think it
still took over an hour to cut both ends flush with the casting as that is one tough rope. After getting it
out, I just tried cutting it with a single edge razor which probably took nearly 10 minutes of sawing. These
photos are of the engine after detailing and reinstalling.
For some reason, the transmission seals had been delayed, resulting in another lost week as we waited for them. Upon arrival, they were not the right units. The parts manager managed to find a proper set locally. Maybe we should have gone that way in the first place. With those installed, a few more hours and the big pieces were all reinstalled, again with a couple of helpers to keep things under control. The trickest part was making certain that the transmission went into its proper position without damaging the shift linkages or speedometer drive, both of which are vulnerable and out-of-sight. Although there appears to be plenty of work room under the hood, the engine does not quite clear both the heater blower and the brake booster at the same time. Some paint was scratched off both to be repaired later.
 With the engine compartment empty, the owner could see just how dirty the car had become and asked me to
detail everything and touch up any paint as needed before reinstalling. The best way I found to do all that
was just a handful of shop towels, thoroughly wet with naptha, to scrub the crud off, followed by wiping with
With the engine compartment empty, the owner could see just how dirty the car had become and asked me to
detail everything and touch up any paint as needed before reinstalling. The best way I found to do all that
was just a handful of shop towels, thoroughly wet with naptha, to scrub the crud off, followed by wiping with
 dry towels to remove any residue and polish the paint. This required a few more hours but resulted in an
underside as deserved by the beautiful outside. Finally, I primed and painted most of the removeable parts,
such as, generator, starter, power steering, etc. I also cleaned and touched up the paint on the engine and
most of the driveline, frame and other underbody components. As is probably typical, some of the engine paint
had been scratched off or discolored from heat or oil and gas. Most of the paint on the water pump and
timing chain cover just fell off in large sheets. It really looked too thick and the units were probably
not primed before painting initially. The results can be seen in the front and rear bottom views. The blue
arms belong to the lift, of course.
dry towels to remove any residue and polish the paint. This required a few more hours but resulted in an
underside as deserved by the beautiful outside. Finally, I primed and painted most of the removeable parts,
such as, generator, starter, power steering, etc. I also cleaned and touched up the paint on the engine and
most of the driveline, frame and other underbody components. As is probably typical, some of the engine paint
had been scratched off or discolored from heat or oil and gas. Most of the paint on the water pump and
timing chain cover just fell off in large sheets. It really looked too thick and the units were probably
not primed before painting initially. The results can be seen in the front and rear bottom views. The blue
arms belong to the lift, of course.
The Results
With all that finished, on June 1 I tuned it up and ran it in the shop for an hour or so then drove it around downtown a mile or two. When inspected, no leaks were found. The car is ready to go to the detail shop for washing and final prep before being sent to the museum. It is a nice enough car that I expect it will get a lot of attention while on display. When it comes home, maybe the owner's wife will drive it more now that it doesn't leak so badly.


If you have a small enough torch (I do) and you can protect the cutting edge from the 6000 degree heat it
produces, with great caution you can heat and bend an Exacto blade to 90 degrees. The resulting tool is
capable of reaching into the cavity and cutting the excess seal off flush with the casting.
Update - The Museum

 By mid-June, it was time to deliver it to the museum. We leased a tilt-back truck and driver for the day to
move it as the only access into the building is a truck loading dock. This photo was taken in the owner's
"clean" shop, after detailing and ready to go on display. (I suppose you can see that it actually
is clean.) The one below is after installation at the museum but before the rest of the display items were
added. Unfortunately, the lighting was not ideal (neither is my photography skill) and the photo suffers
a bit accordingly.
By mid-June, it was time to deliver it to the museum. We leased a tilt-back truck and driver for the day to
move it as the only access into the building is a truck loading dock. This photo was taken in the owner's
"clean" shop, after detailing and ready to go on display. (I suppose you can see that it actually
is clean.) The one below is after installation at the museum but before the rest of the display items were
added. Unfortunately, the lighting was not ideal (neither is my photography skill) and the photo suffers
a bit accordingly.
As usual, photography is not allowed of the actual display so I don't have anything else to show. I can say that
the entire show was quite well done and truly worth seeing. The theme was Mid 20th Century American Art, covering
roughly the years 1940-1960. Examples of many art forms were on display, including photography, painting,
 sculpture, furniture, vacuum cleaners and, of course, our Thunderbird. I even saw one of those toasters that
you put the bread in one end and it slowly walks through, coming out toasted to perfection at the other end,
just like the one I remember my grandmother had. The display ran from June 30 through August 21. Below is a
scanned copy of the front and back of the brochure. I have not shown anything else due to potential copyright
infringement but it also included several examples of the art and artifacts on display.
sculpture, furniture, vacuum cleaners and, of course, our Thunderbird. I even saw one of those toasters that
you put the bread in one end and it slowly walks through, coming out toasted to perfection at the other end,
just like the one I remember my grandmother had. The display ran from June 30 through August 21. Below is a
scanned copy of the front and back of the brochure. I have not shown anything else due to potential copyright
infringement but it also included several examples of the art and artifacts on display.
The Museum - Bonus
Since we had the capability, we also retrieved a 1949 Packard from storage for another owner, detailed it and
delivered it to

 the museum for the same display. Here it is as placed on the display floor. Again, the lighting is not ideal
so I include a photo of it outside the detail shop, taken just before delivery. By the time I returned, our
owner had managed to purchase the Packard for his collection.
the museum for the same display. Here it is as placed on the display floor. Again, the lighting is not ideal
so I include a photo of it outside the detail shop, taken just before delivery. By the time I returned, our
owner had managed to purchase the Packard for his collection.
Now I need to find one for myself but I guess that will have to wait until I finish some of my other projects.