

Chapter II -- The All British Car Show

 While working on some of the other stuff described in Chapter I, I
also tackled the brakes. I had installed all new linings just before
the car was parked so they were still good. I removed, stripped
and painted everything. I was able to find all new wheel cylinders
from Greystone
Automotive and sent the masters to
Whitepost
Restorations for brass sleeves and I installed new kits, also
from Greystone. This is the right rear installed and waiting for the
drum. As you can see, the spring and axle have not been painted. You
also see a new steel hydraulic line along the axle tube. I made all
new lines and fabricated some new linkages for the handbrake. The
front looks a little better, with its spring and axle already finish
painted.
While working on some of the other stuff described in Chapter I, I
also tackled the brakes. I had installed all new linings just before
the car was parked so they were still good. I removed, stripped
and painted everything. I was able to find all new wheel cylinders
from Greystone
Automotive and sent the masters to
Whitepost
Restorations for brass sleeves and I installed new kits, also
from Greystone. This is the right rear installed and waiting for the
drum. As you can see, the spring and axle have not been painted. You
also see a new steel hydraulic line along the axle tube. I made all
new lines and fabricated some new linkages for the handbrake. The
front looks a little better, with its spring and axle already finish
painted.

Here is a shot of the inside of the bulkhead from the passenger's side.
As you can see, the fascia (dashboard) is still in place but
everything else has been removed and the whole thing has been
painted the same as the outside. There will be no "telltale strange
colors" peeking out to spoil the effect of originality on this car. The
center floor section is still not in as it must be removed to install the
gearbox. I have a new set of gearbox mounts and motor mounts from
Anglia Obsolete.
Actually, I got many of the body rubber parts there, including gaskets for
the rear glass and the roll-out windscreen as well as the grommet which
retains the fabric top insert.
The fascia is in pretty good condition although soiled. I will later take it out and clean it - I have cleaned it before so I know it will work. Then I will try to find something, possibly automotive clear coat, to protect it from future deterioration.

 I have just finished overhauling and reinstalling the steering box and
column at this point. In hindsight, this job would have been very much
easier had I done it before installing the floor. The column goes through
a hole in the bulkhead which is half in the fixed bulkhead and half in the
removable floor. The top end of the column, and certainly the box at
the bottom, will not fit through that hole. So I had to assemble it in place
and all its ball bearings are free floating balls. Lots of grease used and
more than a few words spoken here as several attempts were required. The
next step was to reinstall the engine and gearbox. Meanwhile, I sent the
radiator to the shop for inspection and cleaning, then reinstalled it.
This is where we are for these photos.
I have just finished overhauling and reinstalling the steering box and
column at this point. In hindsight, this job would have been very much
easier had I done it before installing the floor. The column goes through
a hole in the bulkhead which is half in the fixed bulkhead and half in the
removable floor. The top end of the column, and certainly the box at
the bottom, will not fit through that hole. So I had to assemble it in place
and all its ball bearings are free floating balls. Lots of grease used and
more than a few words spoken here as several attempts were required. The
next step was to reinstall the engine and gearbox. Meanwhile, I sent the
radiator to the shop for inspection and cleaning, then reinstalled it.
This is where we are for these photos.

Regrettably, some distractions at this point cost me a month or two. It became necessary to formulate the "Revised Car Show Plan": the body would not get any attention after all. I would still try to get the front wings and bonnet, everything forward of the "A" post, in primer and still finish the engine bay.
Finally, I was able to get back on it. I cleaned, serviced and reinstalled
all the instruments, then replenished the fluids and corrected any
leaks. Next I bled the hydraulic systems and corrected leaks. Then I
again bled the hydraulics and corrected leaks. Then once again, etc.
 By this time, the show was almost at hand. I would have time to prep
and prime only one front corner instead of both. Oh well, I selected the
off side. This was the "Re-revised Car Show Plan". Here is the
By this time, the show was almost at hand. I would have time to prep
and prime only one front corner instead of both. Oh well, I selected the
off side. This was the "Re-revised Car Show Plan". Here is the
 wing ready for re-installation. Also shown is the right side bonnet
valance installed, waiting for the wing, and, finally a shot under the
wing after installation. Both these pieces were stripped of any loose
or weak paint, then prepped and primed with two coats of epoxy.
wing ready for re-installation. Also shown is the right side bonnet
valance installed, waiting for the wing, and, finally a shot under the
wing after installation. Both these pieces were stripped of any loose
or weak paint, then prepped and primed with two coats of epoxy.


 Last fall, I had removed the front seat, rebuilt the springs, repaired
the frame and repainted it, ready for reupholstery. I spent the last few
evenings before the show repadding it then loosely covering it with
some fabric just draped over the padding. This is how it looks now,
waiting for proper upholstery. The other shot gives a better idea of
the instruments and fascia.
Last fall, I had removed the front seat, rebuilt the springs, repaired
the frame and repainted it, ready for reupholstery. I spent the last few
evenings before the show repadding it then loosely covering it with
some fabric just draped over the padding. This is how it looks now,
waiting for proper upholstery. The other shot gives a better idea of
the instruments and fascia.
Well here we are at the All British Car Show, May 29, 1998. Our original
goal was not met; neither was our revised goal.
 But we did get here and under our own power.
A friend had offered a trailer, "just in case", but I refused, thinking that
we shouldn't go unless we could make it under our own power. It just didn't
seem right.
But we did get here and under our own power.
A friend had offered a trailer, "just in case", but I refused, thinking that
we shouldn't go unless we could make it under our own power. It just didn't
seem right.
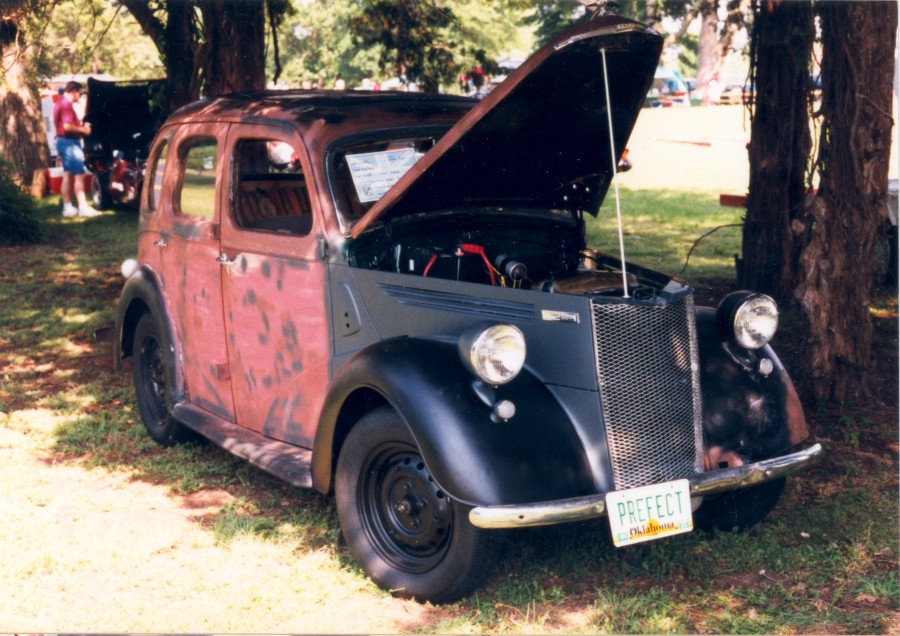
 As you can see, I got there early and was assigned the prime spot. This
photo, under the trees, was shot from the entry point into the
show area, where it was the first car seen by all visitors. The competition
in our class was an early 90's Bentley and a Rolls-Royce Silver Cloud.
Even without these, of course, I didn't expect to be judged very well
due to our state of completion but one judge did apologize stating he wished
there was something he could award more points for.
But we did make the show in the year of the Prefect's 50th anniversary.
Interestingly, it seemed like we drew more interest than any other car
there. There was most of the time a small crowd of visitors, inspecting
it carefully. It certainly was not the usual MG, Triumph, Healey or Jaguar.
Also, about half those who looked wanted to stop and talk about it rather
than just admire and go to the next car as is more typical.
As you can see, I got there early and was assigned the prime spot. This
photo, under the trees, was shot from the entry point into the
show area, where it was the first car seen by all visitors. The competition
in our class was an early 90's Bentley and a Rolls-Royce Silver Cloud.
Even without these, of course, I didn't expect to be judged very well
due to our state of completion but one judge did apologize stating he wished
there was something he could award more points for.
But we did make the show in the year of the Prefect's 50th anniversary.
Interestingly, it seemed like we drew more interest than any other car
there. There was most of the time a small crowd of visitors, inspecting
it carefully. It certainly was not the usual MG, Triumph, Healey or Jaguar.
Also, about half those who looked wanted to stop and talk about it rather
than just admire and go to the next car as is more typical.
Here are a couple more cars I found particularly interesting at the show.
The Lotus, of course, does have the twin-cam Lotus/Ford motor.


Bye for now and thanks for reading this far. It has now been 2 weeks since the show and I am about ready to quit driving for another week or two to remove and finish (to epoxy primer) the left front. Then, after re-installation, I think I will drive it most of the summer, restoring those small items which can be done without long term down time. When the weather deteriorates, the other major projects will begin.
Thanks for reading,
Bayless